VWA Tool bar icons            
Keypad |
The Keypad Icon enables you to invoke a PF function by clicking the appropriate PF key in the Keypad window. Use this keypad if you do not know what your current PF key configuration is on your keyboard. |
Copy, Cut
and Paste | The Copy, Cut and Paste Icons enable you to select or erase a rectangular subset of the screen image and to paste it elsewhere. |
File Transfer facilities
Send or Receive | The File transfer facilities permit the exchange of files between your workstation and the Host Computer you are connected with via Virtel Web Access. It is available only in TSO with ISPF option 6, or in TSO READY mode. |
Screen Capture
Memory Erase | These Icons give you a simple way to capture screen images. It is associated with the option Auto-capture of the Settings dialog. |
Settings facilities | The Settings Icon gives access to a large settings dialog, where you can do some configuration of your VWA environment. |
Macro recording
and execution | These Icons give you an easy way to record frequent processes and to execute them when needed. |
Disconnect | This Icon closes the current session and connection to the Host computer via Virtel Web Access. |
Top of the help page 
Keys and Function key management
Keypad |
The Keypad Icon enables you to invoke a PF function by clicking the appropriate PF key in the Keypad window. Use this keypad if you do not know what your current PF key configuration is on your keyboard. When you open this keypad window the clickable fields corresponding to the main function keys are shown. The key that your mouse pointer is hovering over is shown as a button. When you click it, the corresponding key will be sent to the mainframe application. The 30 main function keys are provided; for the other configuration keys, consult the settings icon. You can hide the Keypad window either by clicking the keyboard icon again or the "red cross" at the top right corner of the window. The "Keep keypad open" option within the Settings icon makes this window stay open. |
Top of the help page
Copy, Cut / Paste facilities
Copy , Cut and Paste facilities
The Copy, Cut and Paste Icons enable you to extract or erase an area of the screen image and to paste it elsewhere. The select process depends on the browser you are running (IE, Firefox, Chrome, Android, Safari) As of June 2012, only Internet Explorer permits the Copy/paste operation to be available across different application windows. The other browsers provide the copy/paste function only inside the VWA 3270 window.
How to define the rectangular area
There are two ways to define the rectangular area to be copied. The selected space will be shown with a red rectangle.
- Use the mouse left click button to draw the space you want to be copied.
- Using the cursor and arrows facilities on the Virtel Web Access window.
From the cursor position, you can push the edges of the rectangle by pressing shift with the left and right arrows (in order to enlarge the rectangle) and by shift with the "up" and "down" arrows (in order to change the height of the rectangle).
It is possible to switch the origin fix side of the rectangle by typing the "reset key" of the keyboard (the left ctrl key).
For example suppose that the cursor is set on the position (line 15, column 47). With shift right arrow you reach column 62 to draw a 16 digits long rectangle. Then you reach the line 10 with the "up" arrow. The rectangle is then 5 lines in height.
If you intend to increase the rectangle of 3 lines more to the bottom (lines 16, 17, 18) hit the reset key and with the "down" arrow place the cursor on line 18.
How to launch the Copy or Cut, and Paste process
There are several different ways to invoke the Copy, Cut or Paste process.
- You can use the "Ctrl C" key combination to copy the rectangular area, and the "Ctrl V" key combination to paste it at the cursor position.
- Or you can use the "Ctrl X" key combination to erase/copy the rectangular area, and then "Ctrl V" as above.
- You can activate the Copy process by clicking the Copy icon and launch the Paste function by clicking the Paste icon on the VWA Tool bar.
- You can activate the Cut Erase process by clicking the Cut icon and launch a Paste function, if needed, by clicking the Paste icon on the VWA Tool bar.
- You can open the context menu by clicking the context button of the mouse (generally a right click). The options on the context menu are:
- Copy launches the copy function
- Cut launches the erase/copy function
- Paste launches the paste function
- Paste by typing pastes the contents of the clipboard character by character as if it had been typed on the screen. This process takes a little longer than the normal paste process and might last an appreciable time for large selections.
- Copy all copies the entire screen to the clipboard.
If you use Firefox, clipboard access must be enabled in the browser settings.
Top of the help page
File transfers
File Transfer facilities. Send or Receive
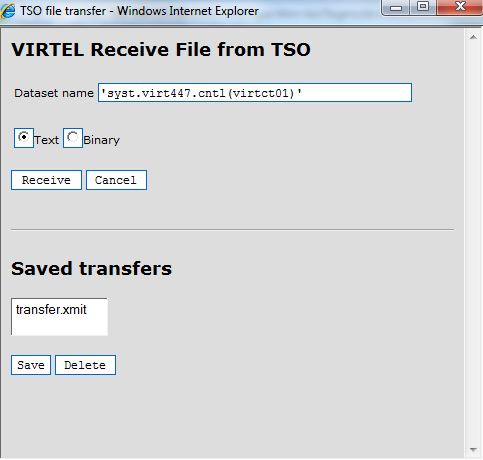
The File transfer facilities permit you to exchange files between your workstation and the Host Computer you are connected with via Virtel Web Access. It is available only in TSO ISPF option 6, or in TSO READY mode. In order to use Virtel Web Access File transfer facilities you must manually reach option 6 of ISPF and then click the icon you wish to use (Receive from Host or Send to Host ).
The Receive from Host window and process
|
 |
|
Type in the field "Dataset Name" the name of the TSO member that you want receive. (Take care of the particular rules and naming conventions: see later).
Choose the pertinent option (Text or Binary) to manage and translate the TSO member file.
- Text option translates the EBCDIC TSO characters to ASCII and generates carriage return line feed /r /n at end of line.
- Binary keeps the transferred characters as they are without adding any end of line special characters.
|
You can terminate the process by clicking the [ Cancel ] button.
If you click the [ Receive ] button, the transfer is performed and an IND$FILE window gives you the choice of saving your target file to complete the Receive process.
In the window opened by IND$FILE, browse your directories and identify the file you want to create or replace. The Download Complete dialog appears when the file has been downloaded.
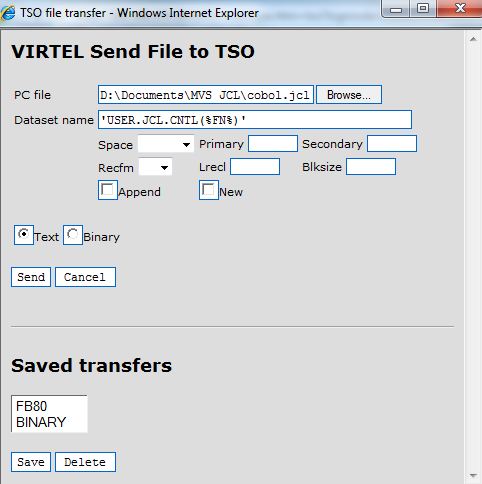
The Send to Host window and process
|
 |
|
Browse your PC to enter the PC File name you want to send. Type in the field Dataset Name, the name of the TSO file to be the target of the send process.
Take care of the particular rules and naming conventions: see later).
Select the file options for the TSO attributes of the target dataset if it does not exist.
- Space: unit of space (TRACK, BLOCK, CYLINDER).
Primary: primary allocation space.
Secondary: secondary allocation space.
- Recfm: record format.
Lrecl: length of record.
Blksize: size of the block (enter 0 to allow the mainframe to default to best size)
If not entered, those attributes are defaulted by IND$FILE TSO.
- Append: check this box if you want the data to be added to the end of an existing file.
- New: check this box if you want the existing target file to be erased before the transfer process starts.
|
|
Choose the pertinent option (Text or Binary) to manage and translate the PC file.
- Text option translates the ASCII to EBCDIC characters and ignores carriage return line feed /r /n ends of line.
- Binary keeps the transferred characters as they are without processing any end of line special character.
|
You can then terminate the send request by clicking the [ Cancel ] button.
If you click the [ Send ] button, the Send transfer is activated. The message File transfer complete is displayed upon successful completion of the upload.
Rules and naming conventions within TSO
Generally, a prefix (High-Level Qualifier) is automatically added at the beginning of the final name before what is entered in the Dataset name field. You can - Ask TSO not to add such a prefix by entering the data name surrounded by single quotes. The name entered is then taken as is.
- Change the current prefix:
Generally, the prefix is assumed to be the TSO user name (the one you used to enter the TSO session).
But it is possible to change this prefix using the "profile pref " command on the command line of the "6" option TSO menu:
PROFILE NOPREFIX removes the current prefix.
PROFILE PREFIX (new prefix value)
Top of the help page
Settings
Settings facilities
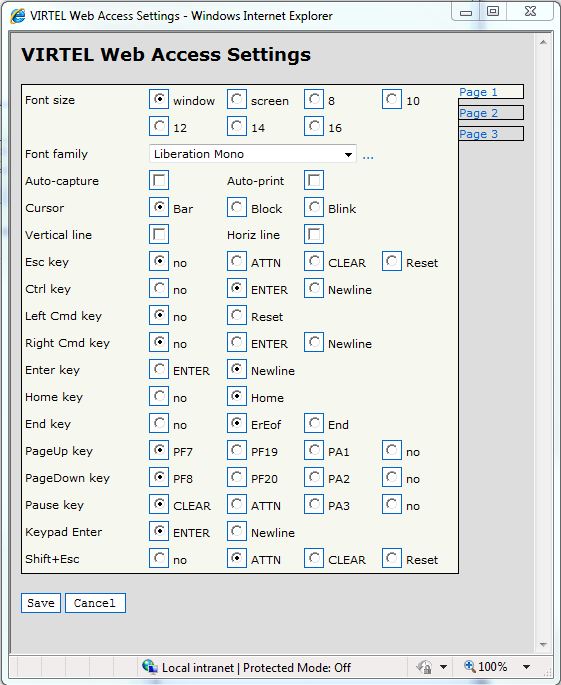
The Settings Icon gives access to choose functions authorization, special function configuration keys, and other session attributes.
|
|
|
Select / Check or enter the settings you need to change |
|
 |
|
- Font size :
Window: the size fits automatically the browser window.
Screen: the size fits automatically the screen frame.
8, 10, 12, 14, 16: forces the font size to the value checked.
- Font family : select the font you prefer in the list. The panel displays a list of a number of commonly used fonts. If the required font is not in the list, click the ellipsis (three dots ... ) to the right of
the selection box and type the name of the font in the box. Any fixed-width font installed on the workstation may be specified. The default is Monospace.
- Auto-capture : select this option to automatically capture the image of each new screen at the time it is displayed by VWA. Note that you can erase the memory and stop the capture process by using the erase memory button.
- Auto-print :
When a print flow is sent from the Host to the specific print terminal, VWA opens a text file window that you can ask to be printed. If the Auto-print option is selected, the text file Window is also opened but the Print process is automatically started and the Windows Print Panel opened.
When the Auto-capture is selected, if the Auto-print is checked, VWA will print the capture file for each new screen; a print process is automatically launched and the Windows Print Panel opened.
- Cursor : select the highlight mode where the cursor is positioned
Bar: underline
Block: reverse video
Blink: blink character (Currently only available with Mozilla FireFox. For other browsers Blink and Block give the same result)
Vertical line: marks the cursor position with a vertical line extended to the top and bottom edges of the 3270 frame
Horizontal line: marks the cursor position with an horizontal line extended to the left and right edges of the 3270 frame
|
|
 |
|
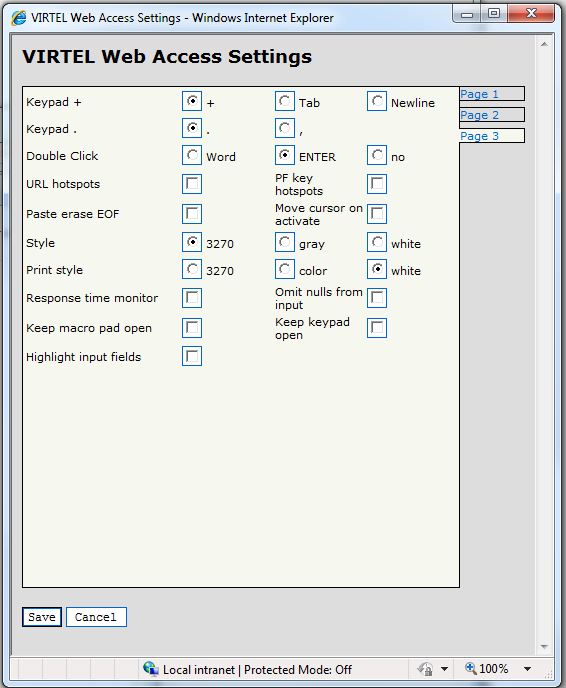
- Double click : if Word is checked, this option permits the user to draw a red selection box around a word on the screen by double-clicking on the word. If the Enter option is checked, then the 3270 screen cursor is moved to the place that was double-clicked and then the Enter key is sent. Nothing happends if the option no is checked.
- URL hotspots : if selected, VWA creates a Hyperlink for any piece of text that begins with "http", "https", "mailto" or "file".
- PF Key hotspots : if selected, VWA transforms each piece of text that begins with "FF=" or "PF=" into a clickable area. When that area is clicked, the corresponding PF key command is sent to the Host.
- Paste Erase EOF : if selected, any extra bytes in a field where a paste has been performed are erase and changed to spaces. If not selected, any extra bytes of the input field are kept as is.
- Move Cursor on activate : When you return to a VWA Window by clicking somewhere in it, if the option is checked, the cursor is moved by VWA to the place you have clicked. If the option is not checked, the cursor then stays exactly where it was before the windows was re-activated.
- Style : Specifies a scheme for the VWA page:
3270 = extended colors on black background
Gray = extended colors on gray background.
White = gray characters on white background.
- Print style : Specifies a scheme for the VWA print page:
3270 = extended colors on black background
Color = extended colors white background.
White = black characters on white background.
|
|
 |
|
- Response time monitor : if checked, VWA puts information about the response time from the Host on the status line at the bottom of the screen. See the status line description.
- Omit nulls from input : if selected, VWA will remove null characters from the input fields. If not, the standard behavior transforms null characters into spaces.
- Keep macro pad open : if checked, the macro window remains open all the time. If not, it disappears as soon as you have clicked a macro in it to execute.
- Keep keypad open : if checked, the Keypad window remains open all the time. If not, it disappears as soon as you have clicked a function key in it.
- Highlight input fields : this option permits the user to display a different background color for 3270 input fields. When this option is selected, all input fields will have a class designator HIGHLIGHTED_INPUTFIELD in addition to their regular class. The style definition for the HIGHLIGHTED_INPUTFIELD class may be overridden by the administrator in the custom.css file.
|
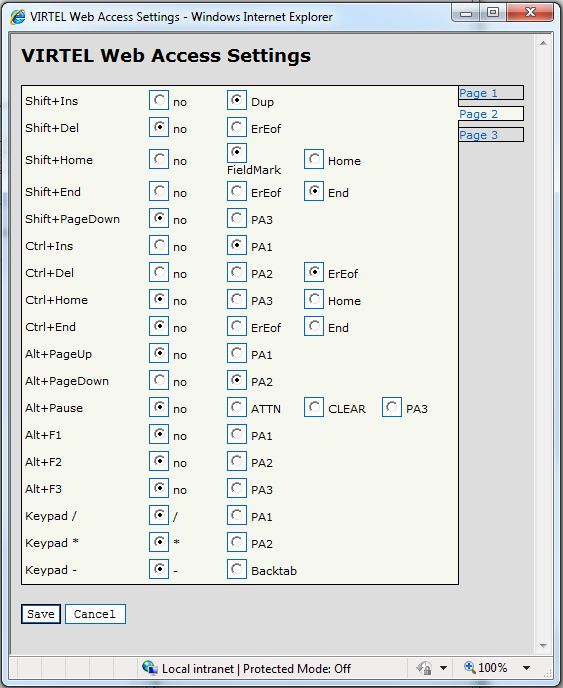
The main functions below can be configured to keys on your keyboard:
- ATT
- Clear
- Reset
- ENTER
- Newline
- Home
- ErEof
- PFxx
- PAxx
- Tab
- Backtab
- Decimal separator
- Word
- Nothing
Top of the help page
Macro Facilities
Macro recording and execution
How to Record the macro processes
Hit the start record icon to begin the recording operation.
During all the recording operation, the start record icon is blinking. VWA records all the keyboard and mouse activities that you produce until you click on the record icon again.
The recorder then asks for the name you want to give to this specific process.
After you enter the name of the Macro being recorded, the operation is completed.
How to play the macro(s)
If you need to execute a recorded macro, open the panel with the execution icon . A list of recorded macros is shown. You can: - Start a macro execution by clicking its name.
- Delete a recorded macro by clicking the suppress function on the menu.
Note that the Execute macro panel can stay permanently opened if the option Keep macro pad open is checked in the Settings panel.
Top of the help page
Status line description
At the bottom of the screen image on the VWA page, there is a Status line.
You can see at the left side of the line if the Response time monitor is set (on the Settings Panel):
- The response time from the Host in milliseconds with the format H:xxxms.
- The local Javascript response time in milliseconds with the format J:xxxms.
Note that the sum of Host and Javascript response times is the actual user response time.
You can see at the right side of the line:
- The current Terminal with the format "RRRRTTTT" where RRRR is the relay and TTTT the terminal's name.
- The associated Printer with the format "RRRRTTTT" where RRRR is the relay and TTTT the printer's name.
- The cursor position on the format ll,cc (ll = line number, cc = column number)
Top of the help page
|